Leather seats are one of the first things people notice when they climb into a car. They are also one of the easiest things to damage with the wrong product or a heavy hand.
Between the Australian sun, sweaty summer commutes, sunscreen, dog claws and the odd spilt flat white, leather takes a beating. Good leather seat cleaning is not complicated, but it does depend on knowing what to do and, just as importantly, what to avoid.
This guide covers the practical side: a safe method, the products worth using, the mistakes that cause cracking and fading, and when it makes sense to hand the job to a professional.
Quick Answer: How Do You Clean Leather Car Seats Safely?
To clean leather car seats safely:
- Vacuum the seats, including the seams and stitching.
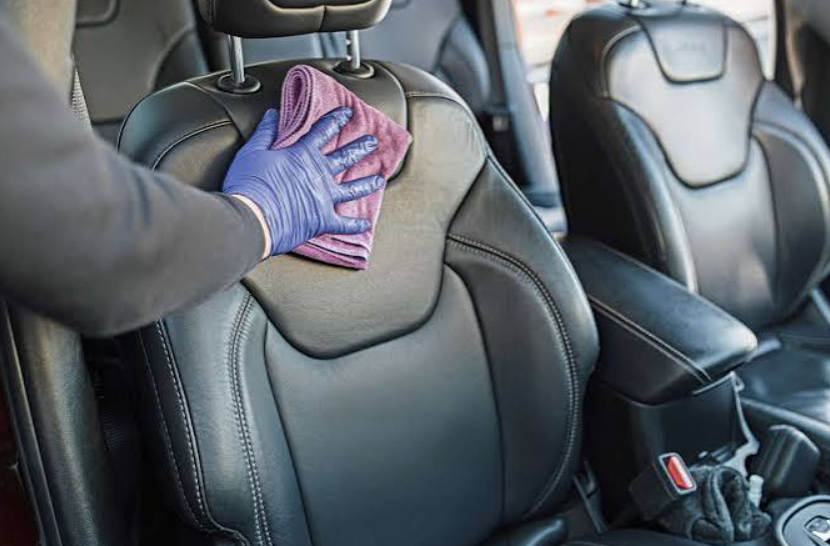
- Apply a pH-neutral leather cleaner to a microfibre cloth or soft brush, not directly onto the leather.
- Gently agitate the surface, working one panel at a time.
- Wipe away residue with a clean, slightly damp microfibre cloth.
- Dry the seat with a dry cloth.
- Apply a quality leather conditioner with UV protection.
Avoid household cleaners, soaking the leather and parking in direct sun while the seats are wet.
Know Your Leather Before You Clean It
Not all car leather is the same, and that affects how you should clean it.
| Leather type | What it is | Cleaning approach |
| Pigmented (protected) leather | A coloured polymer coating sits over the hide. Used in most modern cars. | Tolerates regular gentle cleaning with a pH-neutral cleaner. |
| Semi-aniline | A thin protective layer with a more natural look and feel. | Use less product and test first. It marks more easily. |
| Aniline | Dyed only, with little or no surface protection. Rare in cars. | Very absorbent. Best left to a professional. |
| Nubuck or suede-style | Buffed surface with a velvet texture. | Needs specialist products. Never use standard leather cleaners. |
| Perforated leather | Tiny holes for ventilation or heated and cooled seats. | Use minimal liquid so cleaner does not clog or seep into the holes. |
Your owner’s manual usually states the seat material. If it says “leatherette”, “vinyl” or “synthetic leather”, the cleaning approach is different again, and a gentle all-purpose interior cleaner is generally enough.
Quick test: put a single drop of water on an inconspicuous spot. If it beads, the leather is likely coated. If it soaks in quickly and darkens the leather, treat it as unprotected and be very cautious.
The Do’s of Leather Seat Cleaning
Do vacuum first
Grit is the real enemy. Fine dirt trapped between your body and the seat acts like sandpaper, wearing down the protective coating over time.
Use a soft brush attachment and work along seams, stitching and the crease where the backrest meets the base. Crumbs and sand collect there, and they are the first things to scratch the surface.
Do use a pH-neutral leather cleaner
Leather and its coating are sensitive to harsh chemistry. A dedicated, pH-balanced leather cleaner lifts body oils, dust and grime without stripping the finish.
Look for products designed for automotive leather rather than furniture leather. Car seats face heat, UV and friction that lounge chairs never see.
Do apply cleaner to the cloth or brush, not the seat
Spraying straight onto the leather can lead to over-wetting, patchy marks and cleaner pooling in the seams. Apply a small amount to a microfibre cloth or a soft horsehair or synthetic leather brush, then work it in.
Do work in small sections
Clean one panel at a time, such as a bolster, a seat base or a headrest. This keeps the leather from sitting wet and gives you more control over the result.
Do use a soft brush on textured grain
Many seats have a pressed grain pattern that holds onto dirt. A soft leather brush gently lifts grime out of the texture without scratching. Light pressure is enough. If you feel like you are scrubbing, you are pushing too hard.
Do wipe away residue and dry the seat
Leftover cleaner can leave a tacky film that attracts more dirt. Follow up with a clean, barely damp microfibre cloth, then a dry one. Leave the doors open briefly so the leather can settle before you condition it.
Do condition after cleaning
Cleaning removes surface oils along with the dirt. A good conditioner replaces moisture, keeps the leather supple and helps it flex rather than crack. Choose a water-based conditioner with UV filters if you can, and apply it thinly. Two light coats beat one heavy one.
The Silversponge guide to leather car care goes deeper into conditioning and long-term protection if you want a complete routine.
Do test any new product first
Apply a small amount in a hidden spot, such as the underside of a seat or the lower side panel. Wait until it dries and check for colour transfer or changes in finish before you go any further.
Do clean regularly
As a general guide, a light wipe-down every few weeks and a proper clean and condition every three to six months suits most daily drivers. Cars that sit outdoors in strong sun, carry kids or pets, or have light-coloured leather benefit from a more frequent schedule.
The Don’ts of Leather Seat Cleaning
Don’t use household cleaners
This is the most common mistake. Multipurpose sprays, dishwashing liquid, glass cleaner, bleach wipes and anything alkaline or solvent-based can strip the protective coating and dry out the hide. The damage often does not show straight away. It appears weeks later as dullness, stiffness and fine cracking.
Don’t use vinegar, baking soda or other “hacks”
Online home remedies are tempting, but acidic or abrasive mixtures are not formulated for automotive leather finishes. They can lighten dye and roughen the surface. If you would not put it on a good pair of leather shoes, think twice about putting it on your seats.
Don’t soak the leather
Excess water and cleaner can seep through stitching into the foam and padding beneath. That can lead to dampness, odours and stiffening. On perforated seats, it can also clog the holes and affect ventilation.
Don’t scrub aggressively
Hard brushes, abrasive pads and melamine sponges can burn through the topcoat. If a mark does not shift with gentle cleaning, repeating it with more force rarely helps. Stop and reassess.
Don’t use silicone-heavy or greasy dressings
Cheap shine products can leave a slippery, glossy film. They look good for a day, then attract dust, feel greasy and can interfere with future cleaning and conditioning. Leather should look clean and natural, not wet.
Don’t clean in direct sun or on hot surfaces
Hot leather dries cleaner too fast, which leaves streaks and residue. Park in the shade or work early in the morning or late in the afternoon. In an Australian summer, the cabin can get extremely hot, so let it cool first.
Don’t use heat to speed up drying
Hair dryers and heat guns can shrink and stiffen leather. Air drying, with a little help from a dry cloth, is the safe approach.
Don’t ignore spills
Sunscreen, coffee, sauce and oils soak in quickly. Blot, never rub, and treat the spot as soon as you can. The longer a stain sits, the harder it becomes to lift without leaving a mark.
Don’t forget about dye transfer
Dark denim, new bags and some jackets can leave blue or black marks on light leather. Address these early with a suitable leather cleaner. Older transfer marks are often much harder to remove and may need professional attention.
Step-by-Step: A Simple Leather Seat Cleaning Routine
What you will need
- Soft-bristle vacuum attachment
- pH-neutral automotive leather cleaner
- Soft leather brush
- Three clean microfibre cloths
- Water-based leather conditioner with UV protection
- Foam applicator pad
The method
- Vacuum thoroughly. Include seams, stitching and the gap behind the backrest.
- Test the products. Try the cleaner on a hidden patch first.
- Clean one section at a time. Apply cleaner to the brush or cloth, and gently work it into the grain.
- Lift the dirt. Wipe with a damp microfibre cloth, folding it often so you are always using a clean face.
- Dry the area. Use a separate dry microfibre cloth.
- Let it rest. Give the leather 10 to 15 minutes before conditioning.
- Apply conditioner. Use a foam pad in a thin, even layer. Wait as directed on the product, then buff off any excess.
- Check your work. The seat should look clean, matte to satin and feel soft, not slick.
Leather Care Tips for Australian Conditions
Our climate is tough on car interiors. A few habits help leather last much longer.
- Use a windscreen sunshade. UV and heat are leading causes of fading and cracking.
- Tint your windows where legal. Quality window film reduces UV and cabin heat.
- Park in shade or undercover whenever you can.
- Wipe down after hot, sweaty drives. Body oils and perspiration build up quickly in summer.
- Be careful with sunscreen and insect repellent. Both can stain or degrade the finish if they are left on the seat.
- Use a seat cover for pets or tools. Claws and rivets scratch coatings.
- Keep heated seats in mind. Repeated heating dries leather out, so conditioning matters more.
How Often Should You Clean and Condition Leather Seats?
| Situation | Suggested frequency |
| Light, occasional use, garaged | Clean and condition every 4 to 6 months |
| Daily driver, mostly parked outdoors | Every 3 months, with a quick wipe monthly |
| Family car, kids or pets | Every 2 to 3 months, plus prompt spill care |
| Light-coloured leather | Every 2 to 3 months |
| Rideshare or high turnover | Monthly light clean, deeper clean every 2 months |
These are guides, not rules. If the leather feels dry, looks dull or has started to darken at the bolsters, it is time.
When to Call a Professional
DIY works well for routine upkeep. Professional help makes sense when you are dealing with:
- Deep-set stains such as ink, dye transfer or old food and drink spills
- Light-coloured, aniline or semi-aniline leather
- Cracking, peeling or worn bolsters
- Persistent odours, which may point to moisture in the foam
- A car you are preparing for sale or a long-term protection treatment
A professional interior detailing service uses controlled products, extraction methods and the right tools to clean thoroughly without over-wetting. If your seats need more than a weekend clean, explore Silversponge’s professional car detailing services to see what a full interior treatment includes.
The Bottom Line
Good leather seat cleaning comes down to a few principles: remove grit first, use a pH-neutral product, apply it gently, keep moisture to a minimum and always condition afterwards. Avoid household chemicals, harsh scrubbing, heat and glossy dressings, and your seats will stay softer, cleaner and better looking for far longer.
Leather is a long-term investment in your car’s comfort and resale value. A little regular care costs far less than reupholstering.
Frequently Asked Questions
What is the best way to clean leather car seats?
Vacuum first, then use a pH-neutral automotive leather cleaner on a microfibre cloth or soft brush. Wipe clean, dry the seat and apply a UV-protective conditioner.
Can I use soap and water on leather car seats?
Mild soap in very small amounts is sometimes used in an emergency, but it is not ideal. Dishwashing liquid and many soaps are too alkaline and can dry the leather over time. A dedicated leather cleaner is safer.
How often should I clean my leather car seats?
Most cars benefit from a light wipe every few weeks and a full clean and condition every three to six months. Increase frequency if your car is parked in the sun, used for family duties or has light-coloured seats.
Is vinegar safe for cleaning leather seats?
No. Vinegar is acidic and can dull, dry out and fade the protective coating on car leather. Stick with a pH-neutral cleaner made for automotive use.
Should I condition leather seats after cleaning?
Yes. Cleaning removes surface oils, so conditioning restores moisture and flexibility, and helps prevent cracking. Use a thin layer and buff off any excess.
How do I remove stains from leather car seats?
Blot fresh spills straight away without rubbing, then use a leather cleaner and a soft cloth. For ink, dye transfer or old stains, a professional is the safest option because aggressive attempts can remove the colour.
Can I clean perforated leather seats myself?
Yes, but use very little liquid. Apply cleaner to the cloth or brush, not the seat, and avoid soaking the holes. Excess moisture can clog perforations and soak into the foam.
What should I never use on leather car seats?
Avoid bleach, household sprays, glass cleaner, vinegar, baking soda, abrasive pads, melamine sponges and greasy silicone dressings.
Why do leather seats crack?
Cracking usually comes from a combination of heat, UV exposure, dryness, harsh chemicals and friction. Regular cleaning and conditioning slow this down considerably.
Is professional leather seat cleaning worth it?
It can be, especially for heavily soiled, light-coloured or older leather. Professionals use appropriate products and techniques to clean deeply without causing damage, and can advise on long-term protection.
Ready to Give Your Leather Seats the Care They Deserve?
Whether your seats need a refresh, a deep clean or protection against the Australian sun, the Silversponge team is here to help. Explore our leather car care services, or contact the Silversponge team today to book your car in and get expert advice tailored to your vehicle.